Thursday, June 28, 2012

My Take on Chevron Nails

So I like the chevron look, you know the diagonal triangles in stripes on your nails? Ya I'm not sure how to explain it so I'm just going to show you.


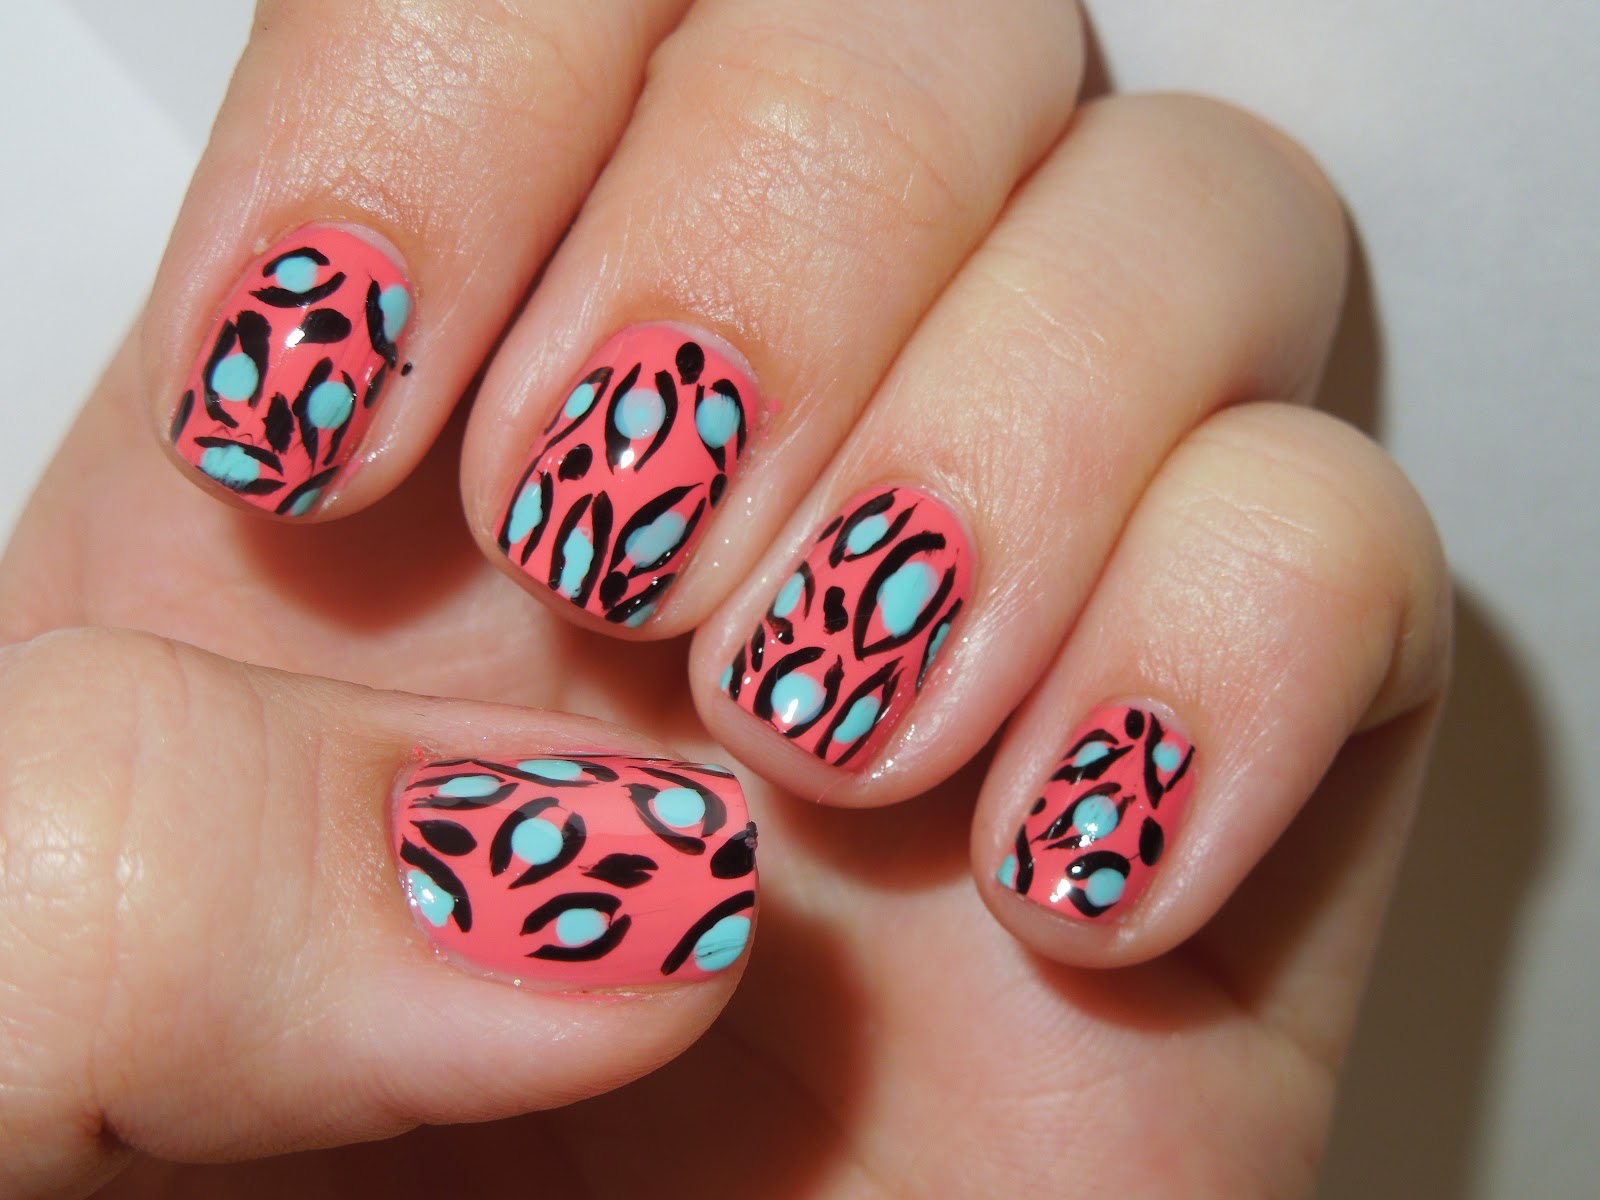
See what I mean? Now I did these on the fly so please ignore the slight mistakes but not everyone can be perfect! lol Plus from far away(like most people are when they look at your nails) you cant even tell!


So First I started out with a base coat of China Glaze - Aquadelic One of my favorite colors ever! The stripes are Revolon Top Speed - Royal(another favorite) and I just used a black striper for the black stripes.


Ok so this is how I did it. I used little pieces of tape to tape off the areas I wanted to stay light blue and then painted over it in the dark blue and before it was dry i took off the paint to leave the design.


I don't know if you can tell in this picture or not but the tape I was using didn't really stick that well and it bled a little but that gave me the bright idea to add the black stripe along all of the dark blue. I'm glad I did this because I think it really made the design pop!


These where super easy to do and like I said I did them on the fly and even managed to take pictures while I did them so I know any one can do these! On some fingers I alternated the way I placed the tape, either facing up or down and alternated where exactly I put them. Thats why none of them really look the same. I think next time I'll try to do lots of different colors! maybe a different one on each finger? and I'll use better tape too! There is just SO many posibilities with this design!


Thanks so much for reading and I hope I added a little inspiration to your day!

:)


Wednesday, June 27, 2012

Essence Snow White mani

The movie Snow White and the Huntsman inspired Essence's newest collection- the Snow White collection.
The collection itself consists of seven polish colors— one for each of the seven dwarfs— and three "special effect toppers." I was immediately drawn to the display in the store, but I wasn't thrilled with the seven colors. I did, however, really like two of the three toppers.
I started with TWO layers of a base coat, in this case, I used Seche Base. I recommend two layers of base coat any time you want to apply serious glitter or sparkle to your nail, simply because it protects your nail bed.

Then I used The Color Workshop Nala nail color in Bronze as a base color. I needed two coats of this color to get the pretty mocha-ish color I was looking for.

One coat:

 Two coats:
Then I used Essence Special Effect Topper: The Evil Witch to paint 8 of my nails. It took two to three coats of the color on each nail to get the desired effect of the glitter.
I loved how the glitter pieces were large and rounded- you don't often see a glitter polish like that.
Then I painted one nail on each hand with Essence Special Effect Topper: The Huntsman.
What I love about this polish? The glitter flecks were all different shapes and sizes. Plus, it had real glitter in it. It shined and sparkled and looked fabulous.
Look closer...

For both the purple and gold glitter polish, the clear polish was wonderful. It was not goopy or sticky or anything - it glided on nicely and held the glitter in well.
I wore this mani - coincidentally actually- to go see the Snow White movie with some friends. It was good! :)

Base coat: Seche Base
Base color: The Color Workshop Nala nail color in Bronze
Purple glitter: Essence Snow White Collection Special Effect Topper: The Evil Witch
Gold glitter: Essence Snow White Collection Special Effect Topper: The Huntsman
Top coat: Seche Vite


Tuesday, June 19, 2012

YaBaDaBaDooooo Fred Flinstone Nails!

So these nails I did by accident but they came out really cool! I was going for a leopard print but it didn't quite come out like I had imagined. So instead of calling these leopard nails I'm calling them Fred Flinstone nails because that's what they remind me of.


See what I mean? They look similar right? Well at least the colors are kind of similar to me :)


This is what I used to get this design. From left to right; Seche Vite top coat, Maybelline Color Show - Coral Crush, Wet n Wild Megalast - I need a Refresh Mint, and A black striper mine is from color club.


First I did my base coat of Coral Crush. I had just bought this color and had to do something to jazz it up a little and I was thinking why not leopard spots?? It sounded good to me so I took my black striper and made some bracket looking shapes and some dots just randomly through out my nails.


After I did this I picked a contrasting color( I need a refresh mint) and added dots to all of the brackets and I was thinking Tah Dah Leopard! Ehh Not really.


This is what I got not quite the leopard I was going for(next time I'll practice first.) But I still really liked them and the orangey and blue colors reminded me of Fred Flinstone so there you have it! Fred Flinstone nails :)


I hope you enjoyed these pre-historic nails! And I hope I added a little inspiration to your day thanks so much for reading!!

:)


Monday, June 11, 2012

Feather Nails Anyone???

So I did feather nails close to a year ago and while shopping at Micheal's the other day I realized that hey those where really cool and that I should do them again so hear we are Feather Nails!! :)


Ok so these may look difficult to do but trust me they are much easier then regular nail art that's for sure!


So this is what I used Started with a base coat of my favorite Nail Life Nail Revitilizer in Original, then I used 2 coats of Sally Hansen Smooth and Perfect in Linen and after I was done I topped it all off with Seche Vite top coat of course! And of course the thing that made this manicure possible feathers!! I picked these up at Micheal's and they are multi colored spotted feathers and they where only a few dollars, I would definitely recommend experimenting with all different colors for this mani!


To start pick out your feathers for your nails. When I bought my bag of feathers I picked the one with the biggest nicest looking feathers in it. This was a mistake! Because you're not going to be putting huge feathers on your nails just little itty bitty ones. So if you go out looking for feathers for your nails I recommend picking the bag with a bunch of little one instead of the bag with a bunch of big ones.


After your first coat of polish dried and you have applied your second before its dry all you do is stick a feather on your wet nail. Easy peasy! You wanna do this to one nail at a time so that the polish stays wet.


I though they looked pretty cool like this but DEFINITELY not practical lol. So you gotta trim them up just take nail clippers or cuticle nippers and cut them off right at the tip. After I did that I let them dry completely and them buffed the tips just to make sure nothing was sticking out anywhere. And when you're all done trimming everything up then apply your top coat. Because the feathers are not completely flat to get that flat shiny polished look your gonna need a couple layers of top coat.


But that's it really nothing to it! Now I experimented with putting a different base color under your nails before putting on the feathers and to get that to look right your gonna have to wait until the color dries and then apply a clear coat of what ever you have handy and then stick the feathers to that. If you stick them directly to the colored polish the feathers get lost and it just doesn't look right.


Thank you so much for reading! I hope I added a little inspiration to your day!

:)

Wednesday, June 6, 2012

How to Fix a Torn Nail

Ok imagine this...
      Your nails look beautiful they are just getting to the point where they are long enough to do some really cool designs with, they are all the same shape and size. And then it happens!! The dreaded break the one that happens right at begining of the nail and you have to cut it down to a nub and look lop sided for weeks until it grows out...


Scary huh? Well you don't have to suffer with nubs anymore! I'm gonna tell you the trick to fixing your torn nail. I have 2 different ways to do this and you can do either depending on what you have on had and if you can make it to the store or not.


The first way is to go to Sally's or your local beauty supply store and pick up a nail repair kit. In this tutorial I'm using Orly's nail repair kit. The kit comes with 3 things nail repair powder, a little buffer and a bottle of nail glue.

The first thing you have to do is to make sure your torn nail is clean and free of any nail polish. Be careful not to rip the nail any more then it already is. After you do this you paint over the crack in your nail with the nail glue and let it sit for just a second until its tacky and then dip your nail into the nail repair poweder.


When you take your nail out of the powder brush off the access and let it dry COMPLETELY! I can't stress that part enough because if you don't let it dry then the whole thing gets ruined and most of the time I just had to end up cutting my nail.


After it has dried all the way it will be hard and all you had to do is buff it smooth with the buffer that came with it or one of your own. I used my own because the one that came with it was too little to control for me.


You can still kind of tell where the rip was but ts patched all up now and as soon as you put polish on top of it you can't even tell there was even a problem!

The second way to patch a broken nail is for all you hot tea drinkers our there. The first step is the same make sure the nail is free of all polish and dirt. Then take a hot tea bag and empty out all of the tea. After its all cleaned out cut a patch out of the bag about the size of your tear in your nail. Then using nail glue of super glue (both work just as good as the other one) glue the patch on to the tear. Again let it dry all the way before buffing it out smooth.


Both ways work just as good and as long as you don't mess with it the patches will last unti the next time you use polish remover to take off your polish or until the nail grows back. Which ever comes first lol with me its always until I use remover again.


As always thanks for reading and I hope you learned something new!
:)


Monday, June 4, 2012

Halo manicure

I've seen this called a Halo Manicure, a Framed Manicure and an Outline Manicure. Since I think "halo mani" sounds nicest, that's what I'm going with.

I was pretty hesitant about this design when it first started popping up all over Pinterest and Glamour and nail blogs. It's definitely different, and very interesting. It's all over the red carpet and runways, so it's fashionable. But the black seeping in from the skin looks almost a little bit morbid... I actually surprised myself when I decided to try it out myself.

The verdict: I love it. Like, seriously, it's one my favorite designs ever. Chic, simple, classy.

I paired the popular halo design with a black french tip.


I started with a base coat of my favorite base, Revlon Multi-Care 965. Then I did two coats of a polish I've had for some time but have never used before.

It's the prettiest, nudest nude I've ever worn. It has a really pretty pearlescent shine to it. Two coats of this polish is perfect! I could definitely see this beautiful color being worn on it's own if you do three coats of it. It's so shiny it doesn't even need a top coat, IMO.


Then, I painted black French tips. Since I painted free-hand tips, it's easiest to paint straight across the tip of the nail and let the paint get on your skin. That's an easy post-mani clean up.
Then, using a straight-tipped nail art brush, I carefully painted the edges of my nail closest to the cuticles.
Easy peasy!

Finally, a top coat of Seche Vite and ta-da! it's done!
When I asked my husband what he thought of my finished mani, he called it "businessy." I like it so much more on my own hands than I did in the photos on Pinterest. Photos really don't do justice to this gorgeous design. I feel like the design paired with the high contrast of nude and black together is very high-fashion and chic.

Base coat: Revlon Multi-Care 965
Nude: The Color Workshop Nala nail color in Nude
Black: Sinful Colors Black on Black
Top coat: Seche Vite

Sunday, June 3, 2012

Black and Neon

So I've been in a nail slump lately nothing I tried I liked but these where a few that I actually did like! First I started with black nails then did the striping and dotting with white before putting the neon on top so that the design would stand out. The designs where just totally random and maybe that's what this look was not my favorite neon look I had this week.


Now it is super hard to take a picture of neon colors but just imagine all these colors as neons like highlighter colors! Because that's what color they where and they looked pretty darn cool! Now these where "ok" in my book but since I'm a little bit of a perfectionist when it comes to my nails I had to redo them. This is what I used.

China Glaze - In the Lime Light. China Glaze - Pink Voltage, Sinful Colors - Dream On, Milani - Dude Blue, Nina Ultra Pro - Solar Flare, Wet and Wild - Black Creme and FINALLY I topped it all off with Color Club - 0-60 Top Coat.

Ok so I didn't get a picture of this but I started painting all of my fingers a different color, since most of these colors are neons they all tool about 3+ coats. after they where all the way dry I used my stripping tape (which is pictured on the bottom of the polish pic) and put a piece across the tips of all my nails. I got my tape online somewhere because I've never been able to find it in any stores around me but you can used just regular scotch taped cut into strips if you want to you can ever cut the tape into funky waves or shapes to make the look even cooler. Ok so after applying the tape I painted my nails black let dry for just a few seconds and then ripped the tape off!


And tah dah! Perfect lines! Now this is the look I ended up sticking with until I had to work and it ruined them :( Stupid work! But anywhoo this is my summer black and neon look and they are oh so cool! lol

As always thank you for reading!!