Tuesday, July 24, 2012

Leopard Rarrwww! :)


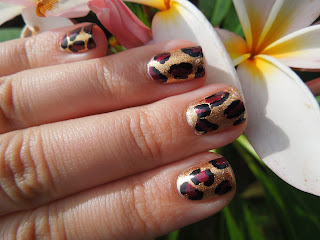
So I have always suffered with doing a leopard print on my nails. no matter how many tutorials I've watched and no matter how many times I've tried I've always came up disappointed. But not today! I have finally unlocked the leopard secret and I'm very willing to share that with you.


OK first of course start with your favorite base coat and as you all learned in my last post Seche Vite Rebuild is my absolute favorite. After that I Painted one coat of Nina Ultra Pro - Big Spender, and on top of that I used two coats of Sinful Colors - All About You. For the inside of the dots I used China Glaze - Heart of Africa and for the outside of the dots Wet and Wild - Black Creme.


This is what my base color looked like. I actually had to shop around a little bit and experiment to get this really pretty orangey gold color but it turned out really nice.


First step in the leopard spots is to use a tooth pick or a dotting tool to make little blobs all over your nails. The trick is actually to not be perfect it the blobs are too uniform then it won't look like real leopard spots. It will look too forced and that's the problem I had with my spots for a long time.


Second and last painting step, after you make your inside blobs you have to make little C like shapes around them. Just like the blobs these can't be perfect or they won't look right. And I suggest not using a striper to do these or else your lines are too straight and end up looking like my Fred Flinstone nails. I used a dotting tool but you can very easily use a tooth pick to get this look as well.


Last step is to clean up your edges and apply your top coat which ever one you want. :) I always used my favorite Seche Vite because I think it gives off the most shine. But sometimes I have a problem with shrinking when I use it.


Thank you so much for reading and I hope I put a little inspiration into your day!

:)


Wednesday, July 11, 2012

Base coat to DIE for!

So when I started really caring what my nails look like I started my nail routine which I try to do at least every other time I do my nails. It's ten easy steps and if you wanna See what I do then you can check it out here 10 steps to my perfect manicure!  But most of the time when I do my nails I only do about half of these things file, base coat, polish, and top coat easy peasy. This post is about a base coat that I recently found that is just to die for! Its called Seche Rebuild.


I bought my bottle at Sally's and it came in a box like in the picture and this polish is amazing! I use it every time I do my nails! On the box it says that it is a unique protein formula that seals the layers of your nail together making it stronger and thicker and less likely to peel or break. I was a little skeptical at first because I feel like I've tried dozens of products that say they're going to do the same thing but this one actually works! Its weird because when you paint it on your nails you can almost feel it, like its really getting into your nails and with in one week, probably about 4 applications, I noticed a difference. My nails are harder and just feel stronger. I keep my nails pretty short most of the time because with the job I have its kind of impossible to have nice long nails but since I've been using this as my base coat I've been growing them out and they have stayed long for a longer then normal without breaking or peeling. The only thing that's sad about this polish is that about a week ago I was at Sally's and it was on the clearance rack and I asked the lady and she said that they are discontinuing it in the stores which made me sad but I did manage to buy the rest my Sally's had for the clearance price :)

I hope you can find this product to try out because it really is awesome, and if you do let me know how it works for you and if you have any other base coat you just love I'd like to know about it them as well. Thanks for reading and don't forget to like our face book page! PrettyInPolish

:)


Sunday, July 8, 2012

Splatter!!!

Splatter nails where just as much fun to do as they look! and yes they made a MESS!


I've wanted to do these for a while and finally had some time to do my nails and time to clean up a mess! lol


This is what I used; a base coat of Seche Vite Rebuild(I can't say enough good things about this stuff!), China Glaze - Aquadelic, Nina Ultra Pro - Pink Flamingo, Sinful Colors - Snow me White, and of course Seche Vite Top Coat.


Ok so first I started out with a base coat of Aquadelic. Then I took an old paint brush and painted the tip of it with Pink Flamingo, and then I just took my thumb and sprayed the paint on my nails by running my thumb across the brush. I did this over a paper plate just so I didn't get paint every where. I did one nail at a time and did the pink and then followed with the white, taking the dried nail polish off of the tooth brush with polish remover when it got to be too much. Now after I finished with my little splatters I took the paint and a tooth pick and made larger spots on my nails just to give my nails a little different look.


Ok now there was a lot of clean up and I probably would have taped off my nails like I do when I do a water marble but after a few Q-tips and my angled brush they came out looking great!


These Nails where awesome and I wish they would have lasted longer then they did! I will definitely be doing these again with different colors because they where so cool and I got so  many compliments on them!


As always thank you so much for reading! I hope I added a little inspiration to your day! Oh and don't forget to "like" our facebook page http://www.facebook.com/PrettyInPolish0

:)

Friday, July 6, 2012

Fireworks!

My birthday is July 3- the day before Independence Day. When I was a little kid, my parents would tell me every year that the fireworks all over were for celebrating my birthday. And of course, I believed them for a few years. LOL. So I've always loved fireworks.

I was torn this year between doing my nails birthday themed or America themed. (I know, I have so many problems, right!?) So I chose fireworks- something that for me, signifies both!
I especially love big colorful fireworks, so that's what I did.
I painted a couple coats of Sinful Colors black on black and then picked out a few colors I thought would pop. I was concerned that the non-neon colors wouldn't be as bright- but they worked so well!
I tried different firework-painting techniques. Some I did long lines, others short. Some bent and falling and others going up and spreading. I played around by drawing fireworks on paper with chalk- a super fun 4th of July craft to do with my little girl.

As you might have noticed, I did this design on artificial nails so that I could take photos for my Etsy shop, Finger Candy. You can buy this design over there, if you want! Check out the link to my shop. :)


Black: Sinful Colors black on black
Blue: Sally Hansen Xtreme Wear Blue Me Away
Green: Cosmetica Fanatica neon green
Yellow: Sally Hansen Insta-Dri Lightning
Neon Yellow: Cosmetica Fanatica neon yellow
Purple: Essence Color n Go Passion for Fashion
Orange: Sally Hansen Xtreme Wear Sunkissed
Pink: Cosmetica Fanatica neon pink
Top Coat: Seche Vite


American flag nails

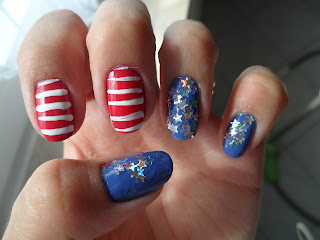
I also did a 4th of July mani! I actually planned to do fireworks nails for Independence Day (post to come!) instead of flag nails, but I recently bought a really pretty blue color and the mani was inspired from that. It was a really quick, easy mani that I didn't spend too much time on. After all, I do live in Germany, and most people in Germany don't celebrate America's Independence Day... LOL.
So, like I said, I started with this gorgeous cerulean blue color. It's part of Essence's "Ready for Boarding" airline collection, and it's called "via airmail."

Pretty, isnt it?
I then layered two fingers on each hand with a red from Eva Supreme color. I did quick white brush strokes with a French Mani white from Rival de Loop. I was about to draw some stars when I remembered some 3d star glitter I have.
I started with just a few stars on each blue nail, and thought it looked too plain, haha. So I clumped them on heavy trying to achieve a clumpy type of look. It kind of worked. LOL.
 I applied the glitter with a clear NYC top coat.
Finished with a couple coats of Seche Vite to lock in the glitter.

This mani took me all of 15 minutes and looked really cute!

Blue: Essence's Ready for Boarding: "Via Airmail"
Red: Eva Supreme lacquer "Flame"
White: Rival de Loop French Manicure White
Top coat: Seche Vite

Happy 4th of July!

Thursday, July 5, 2012

July 4th nails!

So I'm a day late with this post but these techniques can be used for lots of different designs.


These nail where done using a simple technique and I'm sure with a little practice and tome anyone can achieve what I did!


Here's what I used; Seche Rebuild as my base coat, Essie - Boat House as my red, Sinful colors - White on white as my white, China Glaze - Frostbite as my blue and of course Seche Vite as my top coat.


First start with a base coat of White on White.


Then I used masking tape to tape off the tips just to make a nice clean line across the tip.


I painted blue over the tips. The tape makes it really easy to paint because you don't have to worry about getting the line perfectly straight.


See pretty cool huh? You want to take the tape off right after you paint your nails because if the paint dries too much then the nice clean line you want will get messed up.


I used tape for the red lines as well. If i where to do this design again I think I would just free hand the lines because I think that would have been easier then cutting up all those pieces of tape because none ended up being the same size.


This is what it looked like with out the tape. Yes it needs to be cleaned up but its not too bad :)


The thought of painting actual stars on my nails did cross my mind but I also thought that little dots would look just as good and I wouldn't rip my hair trying to get all the stars to look the same. I just used a tooth pick for the little dots.


I hope you all had a wonderful safe 4th of July, and I hope I managed to add a little inspiration to your day! As always thanks for reading! Please let me know if you have any requests or techniques you want to see :)


:)