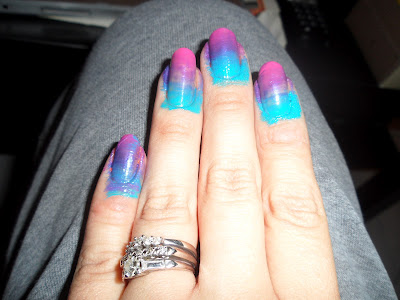
I love this gorgeous gradient design. And I created it differently than I've ever made gradients before. This time, I used a fan nail art brush. It was *very* easy and it looks fantastic.
Instead of the hassle of sponging or the difficulty of blending with regular brushes, using a fan brush allowed me one stroke per nail to make this design. Yes, just one stroke! wow!
This is the brush I used. It is called a fan brush and it is part of a set of nail art brushes I bought from Amazon.de.
First, I practiced using the brush a bit, just to get the hang of it. I tend to practice brush strokes and make color dots on the back of tissue boxes. This is a very well-used tissue box, lol.
I played with a few color combinations before I settled on blue to purple to pink. I put color splashes of blue, purple and pink in that order one after another- close to each other but not touching.
I simply dragged the brush through the colors, pulling them downward. Then I dragged the brush from left to right across my nail. Simple as that! It does leave a good amount of polish all over your skin, though, so it requires a bit of clean up.
But, with some polish remover on q-tips for the big stains and an angled nail art brush dipped in polish remover for the cuticles, it looks perfect.
Add a top coat of Seche Vite for some shine and protection and you're done!
One of the best things about this mani is that it was just as easy to do on my right hand as it is on my left, which I know can be an issue for many DIY manicures.
Base coat: Revlon Multi Care 965
Blue: Sally Hansen Xtreme Wear Blue Me Away
Purple: Sally Hansen Xtreme Wear Deep Purple
Pink: Butter London's Primrose Hill Picnic
Top coat: Seche Vite


I realize this post is from last year so I'm a bit late but I wanted to tell you I really enjoyed your fan brush tutorial. It took away any intimidation I had to try mine. Your gradient/ombre nail look is absolutely beautiful for summer. Thanks!
ReplyDelete